- Liittynyt
- 05.11.2016
- Viestejä
- 2 133
Kirjoittelen tämän englanniksi kun kyseessä ei ole ihan niin yleinen raahattava niin ajattelin että puhutumpi kieli parempi valinta. Ja oletan että suurinosa tekkiläisistä sitä ymmärtää.
---
As I haven't found any proper teardown articles or videos of the Fujitsu Celsius H920, I decided to get into mine for the benefit of mankind. Or something.
Especially the lack of pictures was mildly irritating.
Posting this here (and maybe elsewhere) in the hope that those few people who are looking for this information may find their way here through Google search or whatever they're using.
This will probably be 3 (or maybe 4) parts long and I may or may not do a full blown, remove-everything-from-scratch video someday but for now here's some pictures, I did take quite a few.
---
Part 1: how to get access to the CPU/GPU coolers and other bits and bobs underneath the laptop. (Difficulty level: rather easy, Time: probably 10 minutes)
It's just a matter of removing couple dozen screws along with the obvious: DIMM slot cover, 2.5" drives and their covers, ExpressCard dummy card as well as the battery.
All the various screws and their (rough) locations marked:

The bottom lifts off quite easily, I started from the front edge of the laptop which has the thinnest parts of the bottom cover, especially around the ODD bay. So go easy.

And we're in like sin.

And that's pretty much it. No real point to show how to remove the CPU cooler and such, use your common sense and hopefully experience to get around this laptop. It's not rocket science.
Here's an Imgur gallery with 50+ pictures of the bottom of the laptop covering the motherboard and various PCB's and such from different angles. Enjoy.
In part 2 I'll document how to remove the keyboard and the upper ledge. This will give you access to the miniPCIe slots (yes, plural, there's 2) and the two remaining DIMM slots along with the display hinges for example.
I've been in there before and I have some pictures but they're not good enough so I'll hold off on that for now. I've been meaning to upgrade the WiFi from dual band 802.11n to 802.11ac for a while so that's when I'll probably do this. It won't be soon though.
In part 3 I'll probably go back in through the bottom of the laptop, remove both of the coolers and take a looksie at the other side of the motherboard.
---
I did of course remove the CPU cooler as I wanted to take a gander of what the TIM application looks like.
This particular laptop has the Core i7-3720qm which is a proper quad core with HT, a 45W TDP work horse.
Quite skookum and this laptop does hold the turbo reasonably well under intense load, about 3.2Ghz on all cores and seemingly for quite a long time.
However as I was testing the CPU cooling a while back, I noticed that with intense loads the CPU did get uncomfortably hot and fast.
Let's take a look, shall we?

Well, that's not as bad as I was expecting but that's not good either.
Part of the CPU had very little if any contact to the copper base and probably air pockets.
While the amount of paste, well, I've seen worse. Notice how the paste had almost ran off the PCB of the CPU on to the motherboard.
PSA: if you're replacing the thermal paste and you're applying it to a bare die, cover it completely. Too much thermal paste doesn't hurt as long as you're not being silly e.g. emptying a whole syringe on there but covering every corner of the die is very important in my opinion.
You can use a credit/whatever card or a plastic spudger or whatever you find handy to do it. If you really don't have anything but the TIM syringe, you can use it's tip to spread the paste around. Hell, a finger will do in a pinch if you don't mind it getting covered with TIM.
So, what did the temperatures or clockspeeds look like after?
To recap, the CPU holds on to 3.2Ghz turbo on all cores, it momentarily might kick one core down to 3.1Ghz according to HWMonitor but realistically it keeps the 3.2Ghz 99.9% of the time.
Using IntelBurnTest on Very High settings again, the cores were hitting maximum 84-84-91-88 after one round of IBT or around 2 minutes in to the test. Package max was 91.
After three rounds or around 5-6 minutes in to the test, the maximum numbers were 88-91-96-93 and package 96. This is where it seemed to stabilise.
Not so bad considering it's holding 3.2Ghz under that kind of load which this laptop rarely sees. And that heatsink is just puny.
And keep in mind these are the maximum numbers which the CPU hits for a split second.
I'm going to call that a success. It's no longer hitting TjMax.
The above however is quite an unrealistic load.
Thankfully, I have ran PCMark 10 Extended on this laptop before I reapplied the TIM and PCMark does log the temperatures. (yey)
All I need to do is run it again so we'll have a pretty good comparison. I'll do that later today.
Edit: So I did run the Extended test again.
The overall extended score didn't change much, from 2562 to 2609.
Essentials from 6758 to 6895 (+2.02%) while productivity went from 4881 to 5118 (+4.85%) which is nice.
Digital Content Creation went from 2137 to 2149 (+0.56%) which is well within margin of error and Gaming (obviously) didn't change, 1652 vs 1651.
The big thing is that the CPU isn't hitting TjMax anymore, maximum temp now was 87C briefly during the Rendering test when before it hit 104-105C.
Another example is the Photo Editing test when before it was peaking up to 98-99C and now it's only going up to 82C.

I'd show the nice graphs here that PCMark 10 logs but as stupid as it sounds, they're not to the same scale AND when you compare them it doesn't show them on the same graph and they're still on different scales. Booo Futuremark, boo!
If you're really interested then you can find the result files attached to this post inside an uncompressed zip.
---
As I haven't found any proper teardown articles or videos of the Fujitsu Celsius H920, I decided to get into mine for the benefit of mankind. Or something.
Especially the lack of pictures was mildly irritating.
Posting this here (and maybe elsewhere) in the hope that those few people who are looking for this information may find their way here through Google search or whatever they're using.
This will probably be 3 (or maybe 4) parts long and I may or may not do a full blown, remove-everything-from-scratch video someday but for now here's some pictures, I did take quite a few.
---
Part 1: how to get access to the CPU/GPU coolers and other bits and bobs underneath the laptop. (Difficulty level: rather easy, Time: probably 10 minutes)
It's just a matter of removing couple dozen screws along with the obvious: DIMM slot cover, 2.5" drives and their covers, ExpressCard dummy card as well as the battery.
All the various screws and their (rough) locations marked:
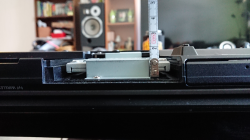
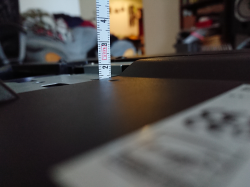
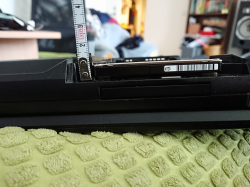
The bottom lifts off quite easily, I started from the front edge of the laptop which has the thinnest parts of the bottom cover, especially around the ODD bay. So go easy.
Keep in mind that this laptop has a dock connector towards the back which is surrounded by EMI shielding ground "lugs" so as you're prying it off it might make an "unpleasant" scraping sound as those release from around it (blue box around them).
There's probably a way to lift the bottom cover straight away from the laptop but mine was being stubborn so I had to resort to a little bit of force and lift from one side till the "lugs" and the rest of the cover released.. But no harm done.
There's probably a way to lift the bottom cover straight away from the laptop but mine was being stubborn so I had to resort to a little bit of force and lift from one side till the "lugs" and the rest of the cover released.. But no harm done.
And we're in like sin.
And that's pretty much it. No real point to show how to remove the CPU cooler and such, use your common sense and hopefully experience to get around this laptop. It's not rocket science.
Here's an Imgur gallery with 50+ pictures of the bottom of the laptop covering the motherboard and various PCB's and such from different angles. Enjoy.
In part 2 I'll document how to remove the keyboard and the upper ledge. This will give you access to the miniPCIe slots (yes, plural, there's 2) and the two remaining DIMM slots along with the display hinges for example.
I've been in there before and I have some pictures but they're not good enough so I'll hold off on that for now. I've been meaning to upgrade the WiFi from dual band 802.11n to 802.11ac for a while so that's when I'll probably do this. It won't be soon though.
In part 3 I'll probably go back in through the bottom of the laptop, remove both of the coolers and take a looksie at the other side of the motherboard.
---
I did of course remove the CPU cooler as I wanted to take a gander of what the TIM application looks like.
This particular laptop has the Core i7-3720qm which is a proper quad core with HT, a 45W TDP work horse.
Quite skookum and this laptop does hold the turbo reasonably well under intense load, about 3.2Ghz on all cores and seemingly for quite a long time.
However as I was testing the CPU cooling a while back, I noticed that with intense loads the CPU did get uncomfortably hot and fast.
Make no mistake, ~45W worth of heat for an itty bitty copper heatsink like that is quite a lot so I don't expect it to be cool as a cucumber nor expect the jump from idle to full tilt to be slow.
But with a rather silly synthetic load, IntelBurnTest on Very High, I was seeing the cores jumping up to and over 90*C pretty much instantly and very shortly the poor thing was hitting TjMax.Let's take a look, shall we?
Well, that's not as bad as I was expecting but that's not good either.
Part of the CPU had very little if any contact to the copper base and probably air pockets.
While the amount of paste, well, I've seen worse. Notice how the paste had almost ran off the PCB of the CPU on to the motherboard.
PSA: if you're replacing the thermal paste and you're applying it to a bare die, cover it completely. Too much thermal paste doesn't hurt as long as you're not being silly e.g. emptying a whole syringe on there but covering every corner of the die is very important in my opinion.
You can use a credit/whatever card or a plastic spudger or whatever you find handy to do it. If you really don't have anything but the TIM syringe, you can use it's tip to spread the paste around. Hell, a finger will do in a pinch if you don't mind it getting covered with TIM.
So, what did the temperatures or clockspeeds look like after?
To recap, the CPU holds on to 3.2Ghz turbo on all cores, it momentarily might kick one core down to 3.1Ghz according to HWMonitor but realistically it keeps the 3.2Ghz 99.9% of the time.
Using IntelBurnTest on Very High settings again, the cores were hitting maximum 84-84-91-88 after one round of IBT or around 2 minutes in to the test. Package max was 91.
After three rounds or around 5-6 minutes in to the test, the maximum numbers were 88-91-96-93 and package 96. This is where it seemed to stabilise.
Not so bad considering it's holding 3.2Ghz under that kind of load which this laptop rarely sees. And that heatsink is just puny.
And keep in mind these are the maximum numbers which the CPU hits for a split second.
I'm going to call that a success. It's no longer hitting TjMax.
The above however is quite an unrealistic load.
Thankfully, I have ran PCMark 10 Extended on this laptop before I reapplied the TIM and PCMark does log the temperatures. (yey)
All I need to do is run it again so we'll have a pretty good comparison. I'll do that later today.
Edit: So I did run the Extended test again.
The overall extended score didn't change much, from 2562 to 2609.
Essentials from 6758 to 6895 (+2.02%) while productivity went from 4881 to 5118 (+4.85%) which is nice.
Digital Content Creation went from 2137 to 2149 (+0.56%) which is well within margin of error and Gaming (obviously) didn't change, 1652 vs 1651.
The big thing is that the CPU isn't hitting TjMax anymore, maximum temp now was 87C briefly during the Rendering test when before it hit 104-105C.
Another example is the Photo Editing test when before it was peaking up to 98-99C and now it's only going up to 82C.
I'd show the nice graphs here that PCMark 10 logs but as stupid as it sounds, they're not to the same scale AND when you compare them it doesn't show them on the same graph and they're still on different scales. Booo Futuremark, boo!
If you're really interested then you can find the result files attached to this post inside an uncompressed zip.
Liitteet
-
564,7 KB Katsottu: 77
Viimeksi muokattu:
")